Tips and Tricks – February 2019
Tip #1 – Use Search Folders to find messages or other Outlook items
A Search Folder is a virtual folder that provides a view of all email items that match specific search criteria. For example, the Unread Mail Search Folder enables you to view all unread messages in one folder, even though the messages might be saved in different folders across your mailbox.
Note: Search Folders can’t contain search results from multiple Outlook Data Files (.pst).
Create a new Search Folder
You can create two different types of search folders.
- Create and use predefined Search Folders.
- Create a customized Search Folder.
Create and use predefined Search Folders
- Select the Folder menu.
- In the New group, select New Search Folder.
- Keyboard shortcut to create a new Search Folder, click Ctrl+Shift+P.
- From the Select a Search Folder list, click the Search Folder you want to add. Some of the predefined Search Folders are only available if you scroll down to the end of the list.
- If the predefined Search Folder has customization options, you'll see those options appear under Customize Search Folder. For example, if you select Mail with specific words, under Customize Search Folder, specify the words to use.
Note: Search Folders use prefix matching searches when you type specific words to include in the search. For example, if you type "rain" in the word list, the Search Folder will include messages that contain the word "rain" and the word "rainy." The Search Folder will not contain messages that include the words "brain" or "grain."
If you have multiple accounts in Outlook, you can specify which account to search. Use the Search mail in box to pick the email account you want to search. then select OK.
Create a customized Search Folder
- Select the Folder menu.
- In the New group, select New Search Folder.
- Keyboard shortcut to create a new Search Folder, click Ctrl+Shift+P.
- From the Select a Search Folder list, scroll down to the bottom and then click Create a custom Search Folder.
- Select Create a custom Search Folder.
- Under Customize Search Folder, click Choose.
- Type a name for your custom Search Folder.
- Enter a name for your Search Folder.
- Click Criteria, and then select the options that you want.
- The Messages tab contains criteria on the message content or properties, such as sender, keywords, or recipients.
- Specify your search criteria.
- The More Choices tab contains criteria on other message conditions, such as importance, flags, attachments, or categorization.
- The Advanced tab enables you to make detailed criteria. Under Define more criteria, click Field, click the type of criterion that you want, and then click the specific criterion from the list. Then in the Condition box and the Value box, click the options that you want, and then click Add to List. Repeat for each criterion that you want to add to this search folder, and then click OK.
- Click Browse, select the folders that you want to be searched.
- Click OK to close each open dialog box.
Delete a Search Folder
If you no longer need a Search Folder, you can delete it. A Search Folder is a virtual folder. Deleting a Search Folder from the folder list doesn't delete the messages displayed in the folder. If you want to delete all messages within a Search Folder, open the Search Folder, select all of the messages, then click Delete on your keyboard.
To delete a search folder, use the following steps:
- In the Folder List, select the down arrow next to the word Search Folders if needed to expand your list of Search Folders.
- Right-click the Search Folder you want to delete, and choose Delete Folder.
Important: Deleting a Search Folder doesn't delete any messages. Deleting a folder that's not a Search Folder will delete both the folder and the messages inside the folder.
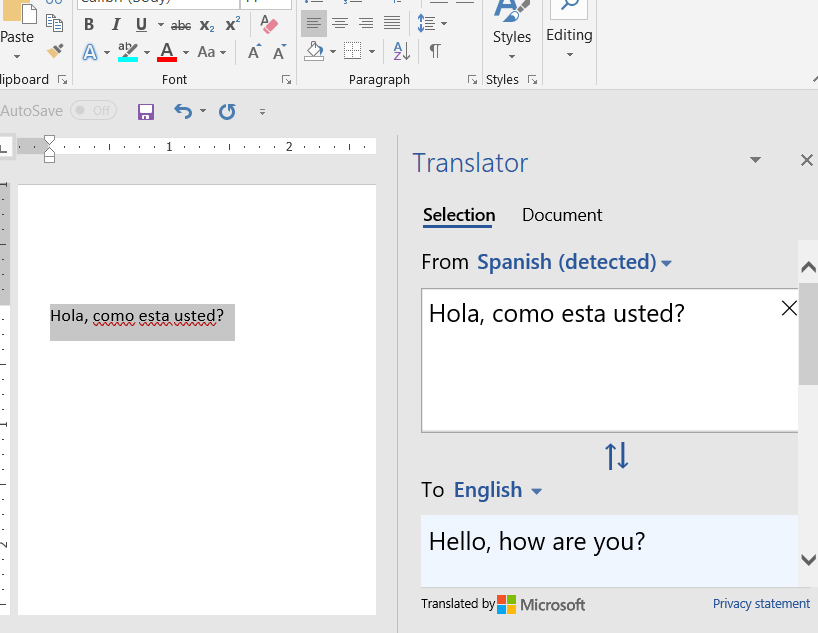
Tip #2 - Intelligent translator in Word for Office 365
The latest Microsoft Word for Office 365 includes an intelligent feature that is capable of translating selected words, phrases or documents between over 60 languages. This feature may be initiated by highlighting selected text and choosing 'Translate' from the drop down menu, or from the Review-Translate menu bar.